Only a Few Days Left of Retired List Promotion |
Wednesday, May 29, 2013
Thursday, May 23, 2013
Embellished Events
Come and make 4 easy but beautiful cards and a gift box to hold them. Keep the set for yourself or give it as a gift! I love this stamp set Embellished Events and am so glad that it made it into the 2013-2014 Stampin' Up! Catalog! Here is a preview of 3 of the cards with the stamp sets... I'm sure that you can figure out what the other card will be!


I just LOVE the new Gingham Garden Designer Series Paper and it fit so well with this class! Here is a quick shot of all the paper together!

Oops! a bit of the red gingham table cloth got in there as well! Disregard that!
Details of the class ( you want to know when you'll be able to make these!)
Date: Monday, June 3 (I know coming up quick, so RSVP today!)
Time: 6:30 pm to 9:00 pm
Place: My stampin' space in my house in West Chicago (when you register I'll send you my address if you don't have it already!)
Cost: $20.00 or place an order that night of at least $25.00 and I'll take $5.00 off your class fee!
R.S.V.P. by Friday, May 31st. Either e-mail inkspiredcardsandcrafts@gmail.com or call me at 630-742-4215!
Can't wait to see you there! When you RSVP tell me your guess as to the 4th card stamp image we'll be using!
Tuesday, May 21, 2013
Tuesday Tools, Techniques, and Tutorials
On Tuesdays, I am going to be showcasing one of our awesome stampin’ and scrapin’ tools; showing you a fun technique to try; or sharing an awesome FREE tutorial! WOOHOO!
This week I am going to share the Double Embossing Technique! I will be doing this in tutorial form using one of my favorite tools, the Big Shot! (did you see that I incorporated all three this week?! Bonus!)
I learned this technique from Linda Augsburg and Ann Sinclair, two of my sideline and they got inspiration from many different online sources
.
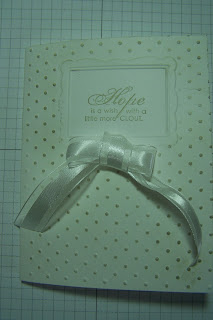
Double Embossing Technique:
Supplies needed:
Card Stock: Whisper White
Big Shot with embossing folders: Perfect Polka Dot Embossing Folder and the Designer Frames Embossing Folder (the rectangle image only)
Stamp Set: Blooming With Kindness
Ink: Sahara Sand
Other: 5/8” Organza Ribbon, Stampin’ Sponge, Glue Dots, and ¼” cardboard

Directions:
1. Cut out a ¼” thick cardboard template using a craft knife ( the center needs to remain intact).
2. Place your card stock into your Perfect Polka Dot Embossing Folder, put the cardboard template on top and run it through your Big Shot with the following sandwich: multipurpose platform on tab 2, embossing folder with card stock in it, cardboard template, and one cutting pad.

3. You will get an embossed image with a blank space where the center was cut out of.

4. Put the card stock into the Designer Frames Embossing Folder, centering where the blank (un-embossed area is) and run through your Big Shot with the following sandwich: multipurpose platform on tab 2, embossing folder with card stock in it, cardboard template, and one cutting pad with the edge placed at the top of the cardboard shape.


5. Run through the Big Shot until you feel the “give”, this means the entire cardboard shape has gone though. TURN THE HANDLE BACKWARDS to back your piece out of the Big Shot. (You don’t want to flatten the 1st embossing!)

6. Using the Sahara Sand Classic Ink, ink your stamp from the Blooming with Kindness stamp set and stamp image inside of the rectangle.
7. Using the Stampin’ Sponge, sponge Sahara Sand ink on top of the embossed images. This will make them “pop”.
8. Tie a bow with the 5/8” Organza Ribbon and adhere to the front with a Glue Dot.

9. Done! Send this gorgeous card to someone who needs a little encouragement and love!
I'd love to see your cards using this fun, easy and oh so pretty technique! leave a comment where everyone can see your card!
Thanks for stopping by!
Monday, May 20, 2013
Single Layer Stamping
Do you sometimes feel that life is too busy? That you need to slow down and simplify things? Often, with card making and paper crafting, we feel that “the more the merrier!” is better! Sometimes, though, less is more. Here is a very cute card using the New Wildflower Meadow background stamp. (available May 31st) I used just one layer! I do like the multi layer look so after I stamped my image, I drew a line of color around the image with an inner border of Basic Black for shadowing. I couldn’t resist adding a bit of bling… so I added pearls in some of the flowers and Dazzling Details on the blue flower and the humming bird and a bit of ribbon, to “tie” it all together!

I hope that you’ve enjoyed today’s post. Please contact me with any questions about this stamp set, technique or any of the supplies used today!
Happy Stamping!
Saturday, April 20, 2013
Meetings ROCK!
I went to my upline's meeting today. Always a GREAT time! There are around 60 women that come together every month to learn new things, stamp, eat, laugh and share in the fellowship of crafting. I cherish my time with these ladies! Glenda Travelstead is my upline and she does an awesome job of putting on this monthly, nutty, fun, educational day. She does have helpers every month (yep I went to her house yesterday to help with meeting prep and then today I shared my big shot and one of my framelite dies). Today Linda and Ann did a demonstration of the Double Embossing Technique. OMG their samples were georgous! They then challenged us to go home and make a card using this technique. Here is my card using the Double Embossing Technique. I hope that you've enjoyed it!


Supplies Used:
Card Stock in Primrose Petals, Raspberry Ripple, and Whisper White
Stampin' Write Markers in Primrose Petals, Raspberry Ripple and Gumball Green
Punches: Decorative Label and Large Oval
The Big Shot with Designer Frames Folders and Lacy Brocade Embossing Folder
3/8" Stitched Satin Ribbon in Raspberry Ripple and Stampin' Dimensionals
Contact me today to learn this awesome technique or to order the supplies!
Cathy
630-742-4215
Thursday, January 31, 2013
stampin the cold away
What to do on a cold winter day? Make some hot chocolate, fire in the fireplace, favorite station on Pandora and STAMP! Woo Hoo! sounds like my kind of day! Our winter has been wierd this year, setting records all over the place. 333 days with snowfall less than 1 inch and record temps (in the 60's!). So I guess it is hard to complain when it gets cold now. Well here is my card for today,

Hope that everyone has a great day! Spend some of it stamping!
Wednesday, January 30, 2013
Paper Rosette Tutorial
Here is the tutorial for the rosette that I had on my thank you card. There are a couple of different ways to do this and this is my method 1. If anyone is interested, I might post method 2 one day!
Paper Rosette Tutorial
Method 1
Instructions by Cathy Auney inkspiredcardsandcrafts@gmail.com. Inspiration by many Demonstrators!
1. Gather all supplies: Card Stock scraps and 1 to 1-1/2” Card Stock or Designer Series Paper Scrap Strips, 1-3/8” or 1-1/4” Circle Punch, Eyelet Border Punch, Pinking Hearts Border Punch, Crimper Sticky Strip, Glue Dots, Paper Snips, Buttons, Brads or other embellishments.

2. Punch a circle from the Card Stock scraps with one of the Circle Punches.


4. Run the punched Card Stock strips through the Crimper twice. (this will break down the Card Stock fibers and make it more flexible) *if using the DSP, only run it through once.

5. Smooth the crimped Card Stock out and apply the Sticky Strip. Remove the pink tape backing.

6. Take one end of the Crimped Card Stock and put it on the edge of the Circle Punch.

7. As you go around the edge of the circle, scrunch the Card Stock.

8. Keep going around in a spiral until you get to the middle.
9.Cut off the excess (if you cut it on an angle it looks better)

10. For the center of your Rosette, use a Button, Brad, or other Embellishment to decorate the center. ( you can even use a 1/2” Circle Punch for this!)

11. Use Glue Dots to attach your Rosette to your card, scrapbook page or 3-D item!
 |
| 3 X 3 Card |
Subscribe to:
Posts (Atom)